
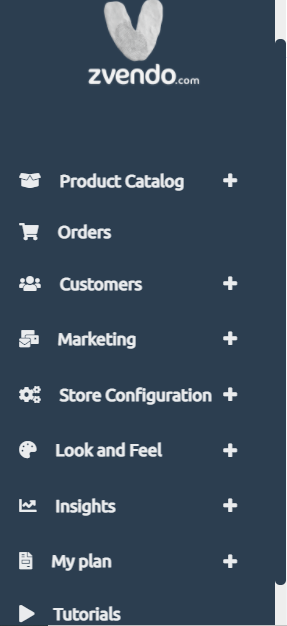
An Overview on zVendo Navigation Bar #
We’ll walk you through the navigation bar of zVendo back-end dashboard to give you an overview of every button on your store back-end.
 #
#
Catalog #
- The catalog menu provides you with several sub-menus, as Taxons, where you can add new taxons, by adding code, name, slug/url ,and description of the taxon.
- The products sub-menu provides you with options, as to filter according to value, edit products, or manage product variants.
- Access inventory and filter your products according to value, check inventory of each product and see the stock available on hand to track your products journey.
- Assign product attributes or characteristics, which will make an easier experience for the customer to find and purchase your product. Filter attributes according to value.
- Manage product options, which were chosen for classification of each product variants, as size, and filter them accordingly.
- Manage your product associations, which you would want to add to link your current product to other products you have with similar objective.
- Access your Stockrooms, where you can edit channels used for selling and add actions as delete or edit your stockrooms or channels.
Sales #
- The sales side menu lets you have access to manage your orders, and filter them according to value, customer, date range, currency assigned, for a better insight into your orders and sales journey.
Customer #
- The customers side menu makes it easier for you to get to know your customers and their interactions with your store or brand, where you can see your customers’ names, Email, when they registered to your store and started interacting with your brand, and where you can assign actions as enabling or verifying your customers.
- Assign customers into groups and filter them accordingly.
Marketing #
The marketing menu enables you to filter your assigned promotions according to value or coupon based possibility, and to also observe your products reviews to have a better perspective about your sales and customers’ response to your industry.
Configurations #
- The configurations side menu gives you several insights to help you with your store management, where you can view channels used for selling, and filter, enable, disable, or delete them.
- Access countries assigned for selling and shipping, where you can assign actions as filtering, editing, or enabling specific countries. Just as easily manage geographical zones.
- Assign desired currencies used for selling and filter them accordingly.
- Manage exchange rates and filter them according to currencies.
- Choose locale/languages desired for store display, where you can enable/disable these languages and also specify each channel language individually.
- Assign payment methods, enable or disable these methods through zVendo payment providers, choose individual channels for specific payment methods, and specify payment getaways, where customers can pay using their credit cards, aka, a third party getaway, or through cash on delivery.
- Understand your shipping methods, assign them according to zones, add new methods, specify the methods used for individual channels. Assign taxes and shipping charges, and choose channels desired for charging.
- Filter shipping categories and assign new ones where you can add categories based on products weight, or zones assigned, cities and countries.
- Access taxes, where you can add new tax categories or filter existing ones. Filter your tax rates just as easily.
- Set up administrators for store management, where you can edit admin settings, by going to action, clicking on Edit, then edit general info, password, additional information, and you can also edit store language for each admin, by selecting preferences, where you can change the language/locale.
- Publish your store after listing your products, you can do that by accessing accounts, then you choose publish store.
- Access custom themes, where you can edit specific parts of your store theme, as changing the font size and color, on the header, footer and body of the page,
- Set up specific cities within assigned countries.
- Create, manage, and edit your unique store identity, by creating a representative project name, website logo, and favicon, which is a special icon to give your store a unique identity that will make it standout, also adding google and facebook analytics script, that represents a key factor for search engine optimization, calculating customer traffic and conversion rate, to have a thorough perspective and a comprehensive conclusion relating to your store.
- Add images to your online store using the image slider menu.
Content Management #
- Manage any store-related content and easily edit it, to control your store layout and how your products are displayed to the audience ,where you can filter any store content blocks, assign new content pages, put pages into categories, as individual product pages that have characteristic similarities that can put them into individual categories .
- Create and edit frequently asked questions.
- Manage and edit individual sections content.
Admin Emails #
Create multiple admin Emails for your store administration management.
Custom Shipping Calculator #
Manage customs in relation to different zones and assign prices accordingly.
Media #
Add images to your store and control store template display.
Blog #
Creating a blog is a wonderful approach to reach millions of customers, through adding unique content and using special terms to draw the attention of potential customers, where you can create articles that have a thorough explanation of your brand and its individual characteristics, that customers will find interesting enough to draw enough traffic to your store.
Associations #
- Manage associations, which you would want to add to link your current product to other products you have with similar objectives.
- Control your product associations, by filtering associations according to name and value ,and edit them accordingly.
View your store #

Finally view your store layout on several channels by accessing your navigation bar, see how it displays your unique identity and accordingly edit it and make bulk changes.


